
The AI Chatbot is a chat bubble you add to your website. Visitors can type or talk to it, and it answers their questions using your content and your live availability, then completes a booking right inside the chat, 24 hours a day.
In this article
This is the website assistant. If you want an assistant that answers your phone, set up the AI Callbot instead; they're separate.
Setting up your AI Chatbot: creating a chatbot, connecting a Knowledge Base, and installing the embed snippet.
Nobody needs to turn this on for you. The AI Chatbot is included on your account. Go to Setup Sell online Chatbots and select New Chatbot to create your first one right now.
Learn how to manage permission groups
Before you start, build at least one Knowledge Base so the chatbot has something to answer from.
Add or change what your chatbot says
The text your chatbot answers from lives in a Knowledge Base, not on the chatbot itself.
- Go to Setup → Sell online → Knowledge Base and add or edit a Text knowledge base. See Build your Knowledge Base.
- Wait for it to show Active. Only synced knowledge bases can be chosen.
- Go to Setup → Sell online → Chatbots, select Configure, and check it under Knowledge Base access.
Step 1: Create the chatbot
- Go to Setup → Sell online → Chatbots.
- Select New Chatbot.
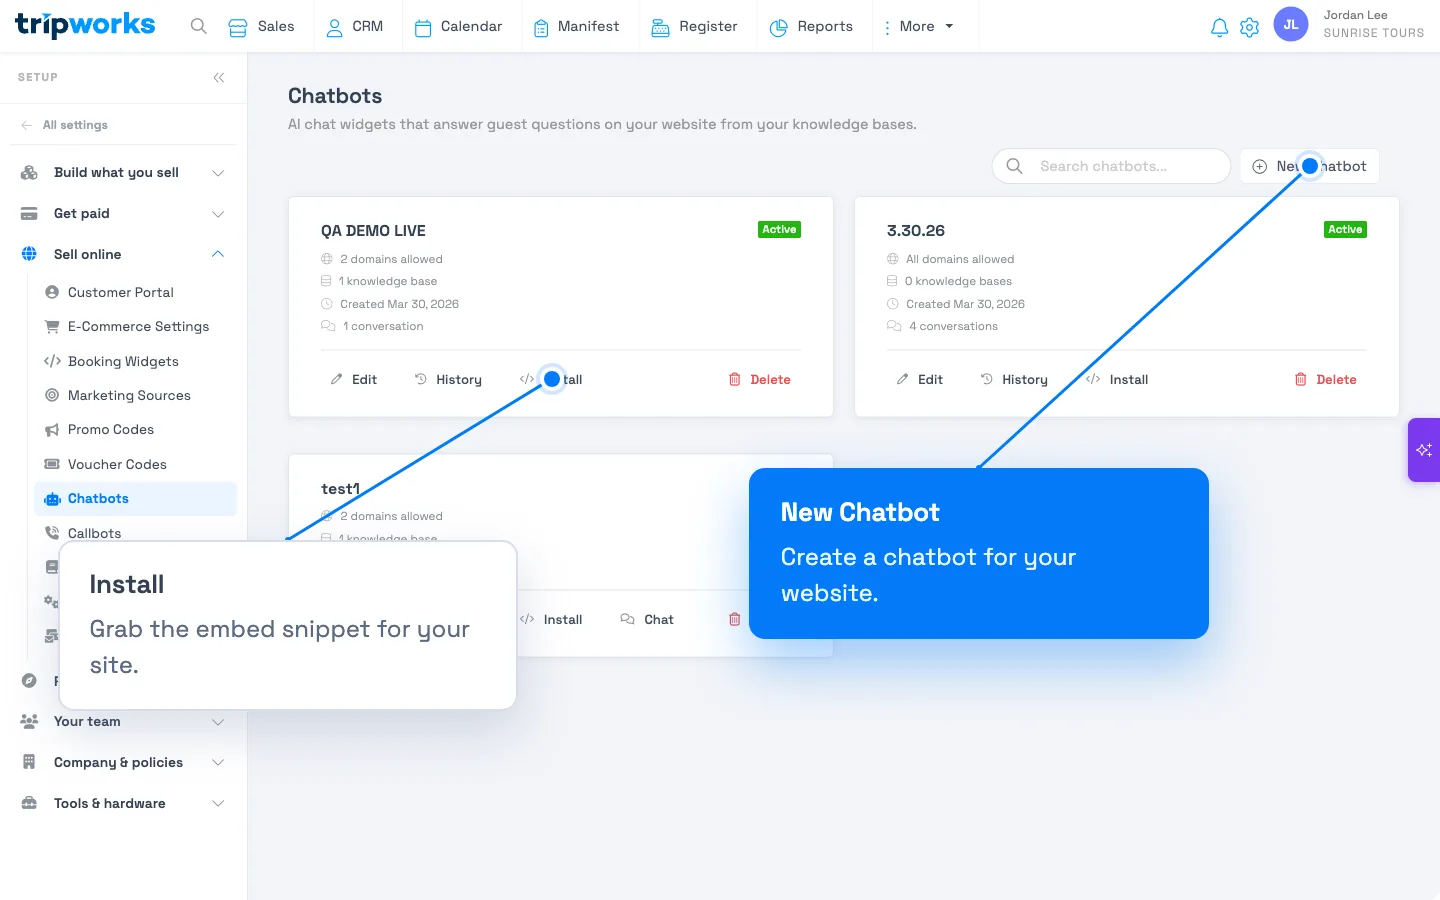
Each chatbot's card shows a live status badge in the top-right corner:
| Badge | What it means |
|---|---|
| Active / Inactive | The chatbot is turned on or off, matching the switch on its Settings tab. |
| Syncing… | The chatbot's agent is being created or updated in the background (for example, right after you create it, change its language/model, or attach a new knowledge base). This clears on its own within a minute or two; no action needed. |
| Sync failed | The last sync attempt failed. Hover the badge to see why, then select Retry sync from the card's action row. |
| ⚠️ amber warning icon (next to Active) | The chatbot itself synced fine, but one or more of its selected knowledge bases couldn't attach. Hover the icon for details: the bot is live, just answering from less content than you selected. |
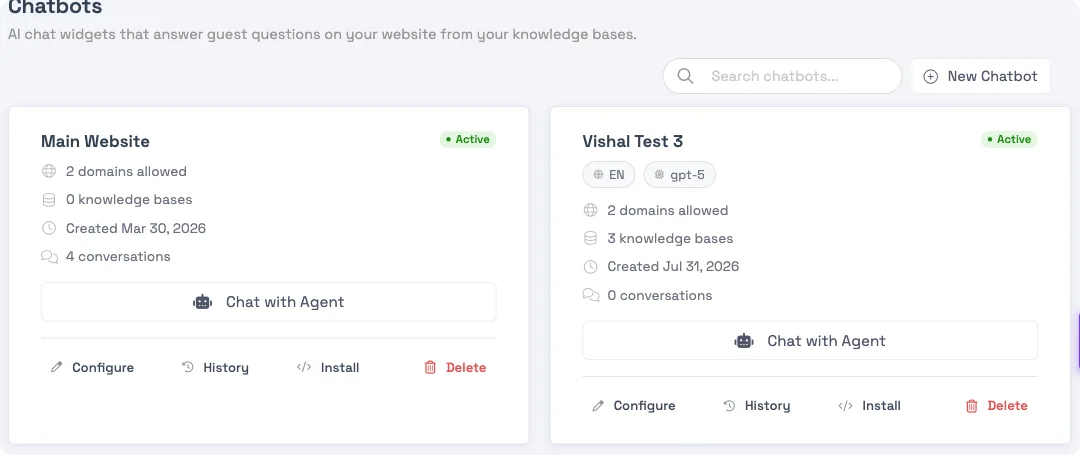
The card's edit action is labeled Configure (it opens the same Settings/Knowledge Base/Allowed domains/Info tabs described below). When a chatbot is mid-sync or its last sync failed, the Syncing… / Sync failed badge shown in the table above replaces the Active/Inactive pill until the sync settles, and a Retry sync button appears in the action row next to Configure.
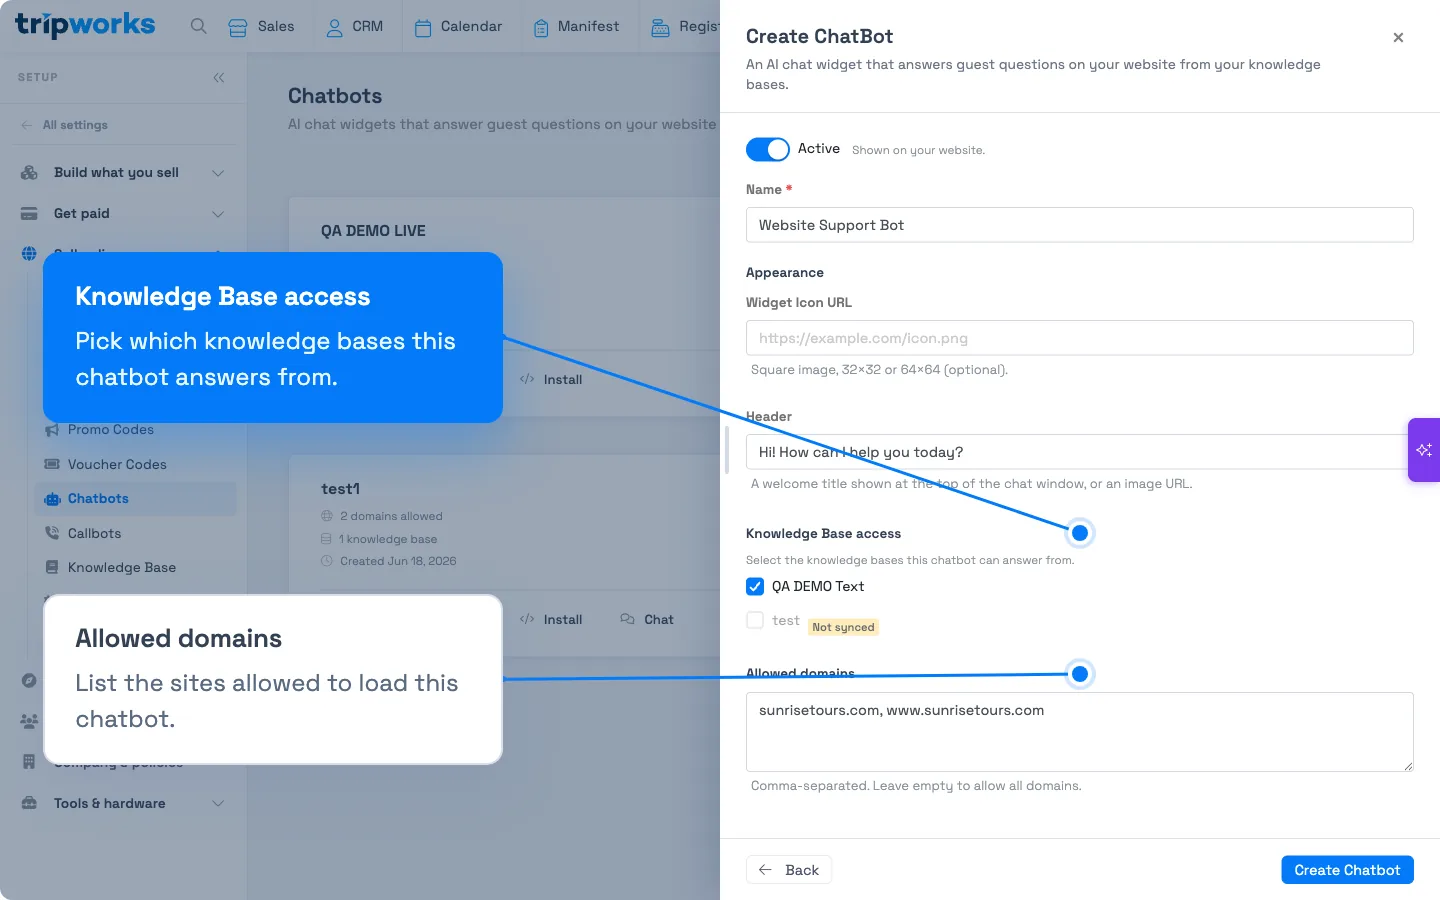
- In the Create ChatBot panel, fill in the details:
| Field | What it's for |
|---|---|
| Name | An internal label so you can tell your chatbots apart; visitors don't see it. |
| Language | The language the chatbot speaks and listens in. Pick from English, Spanish, French, German, Italian, Portuguese, Polish, Dutch, Japanese, Korean, Chinese, Russian, Arabic, or Hindi. This drives both the text and voice sides of the conversation. |
| AI Model | The underlying AI model that powers the chatbot's answers, grouped by provider (OpenAI, Anthropic, and others). The default is a strong, current model, and most accounts never need to change it. Pick a lighter model if you want faster, cheaper responses on a high-traffic site, or a stronger one for more complex, judgment-heavy conversations. |
| Widget Icon URL (optional) | A link to an image to use as the chat bubble icon. |
| Greeting message | The first thing your chatbot says when a visitor opens it. Leave it blank and TripWorks fills in a default greeting that names your business and states what the bot can do; see the Examples section below for a sample. |
| Knowledge Base access | Check the knowledge bases this chatbot may answer from. To add or change the text itself, go to Setup → Sell online → Knowledge Base. Only synced ones can be selected; a Not synced badge means you need to finish syncing it first, along with its word count and content type so you can tell at a glance what the bot will actually draw from. |
| Allowed domains (optional) | Restrict where the chatbot loads: it only appears on the domains you list here (e.g. example.com, www.example.com). Leave empty to allow all domains. |
- Select Create Chatbot. The chatbot appears in your list once it finishes setting up.
You can create multiple chatbots: for example, a different one, with a different knowledge base and a different language, for a partner site.
The Info tab
Once a chatbot is created, open it and select the Info tab. It's a plain read-only reference panel, useful when you're reporting a problem to TripWorks support:
- Agent ID — the unique identifier for this chatbot's underlying voice/chat agent, with a one-click Copy button. Have this ready when you contact support about a specific chatbot.
- Created — the date the chatbot was set up.
- Last seen — the last time the chatbot's agent checked in, if available.
- Knowledge bases — how many knowledge bases are currently attached.
Nothing on this tab is editable; it's for reference only.
Upgrading an existing chatbot
TripWorks periodically improves the underlying chatbot template: better instructions, more reliable booking behavior, or new capabilities. When an update is available for a chatbot you already created, opening it shows an "A newer version of this chatbot is available" banner at the top of the Settings tab with an Upgrade Now button.
Selecting Upgrade Now pulls the latest prompt template onto your existing chatbot in place. Your name, greeting, language, model, icon, allowed domains, and Knowledge Base connections are untouched. Only the underlying instructions the bot follows are refreshed. The banner disappears once the upgrade finishes.
There's no downside to upgrading. It doesn't reset your bot or interrupt an active conversation. If you don't see the banner, your chatbot is already on the latest template.
Step 2: Install it on your website
- In your chatbots list, find the chatbot and select Install.
- Copy the embed snippet shown in the install window. It's a single
<script>tag tied to that chatbot. - Paste it into your website's HTML, just before the closing
</body>tag, on every page where you want the chat bubble.
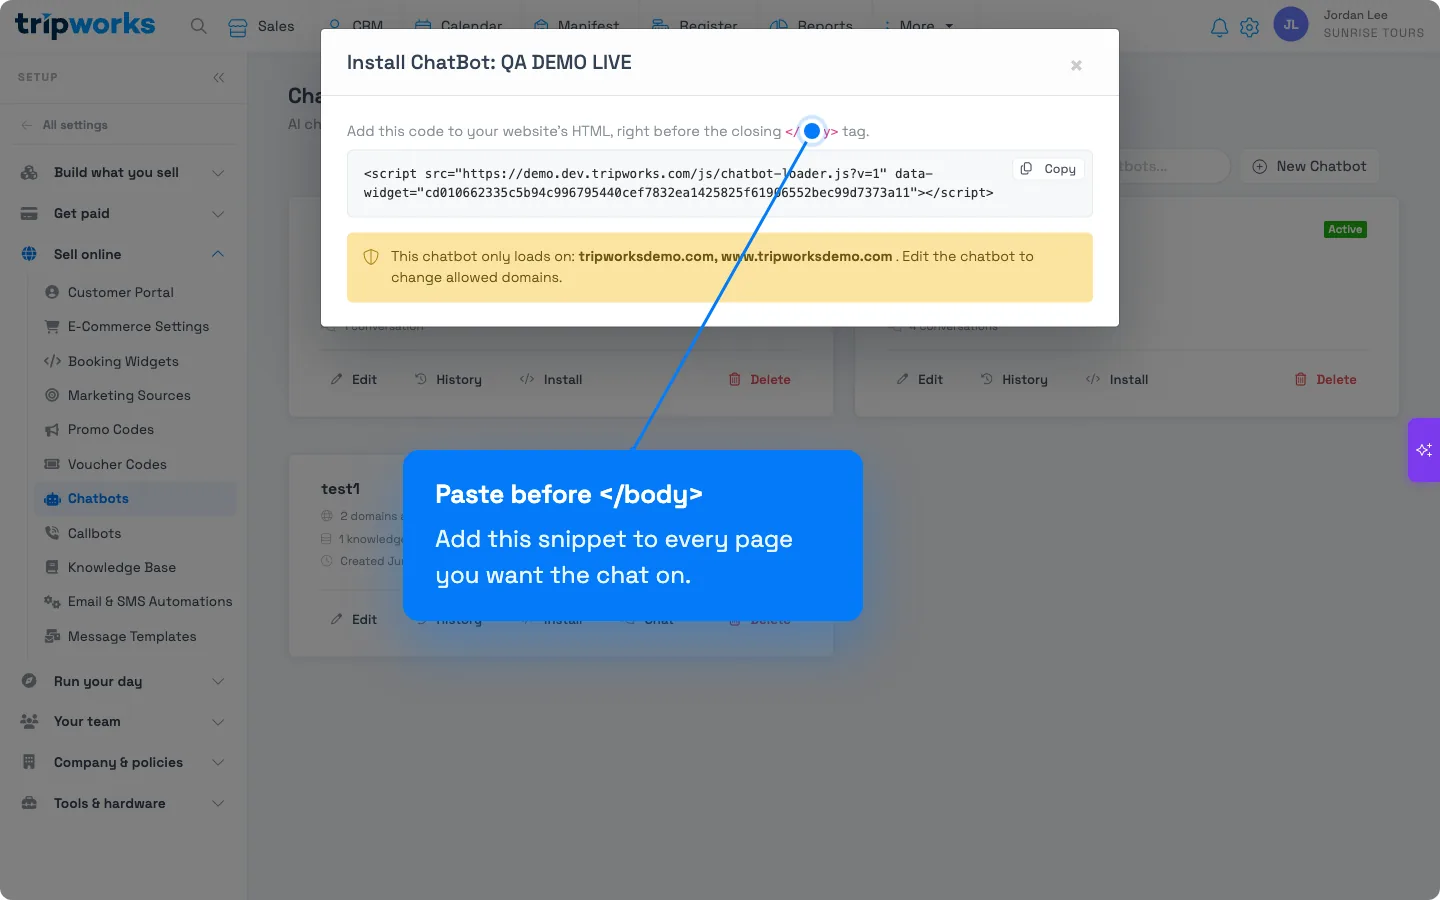
The bubble then appears in the corner of your pages, and visitors can chat by text or voice. Remember the chatbot only loads on the allowed domains you set, so add your live domain there before you go live.
Using a website builder? On Squarespace, Wix, WordPress, and similar platforms, paste the snippet into the site's custom-code / code-injection area (often a "Footer" or "Before end of body" box). Your website platform's help docs show exactly where.
Step 3: Test it
Open a page where you installed the snippet and chat with the bot as a guest would. Ask a question you know is in your knowledge base, and walk through a booking. If answers are wrong or missing, add or correct the content in your Knowledge Base; it re-syncs automatically.
What the chatbot can do
- Answer questions from your Knowledge Base and your live experience details.
- Check live availability and pricing pulled straight from your account (closed and sold-out times are filtered out automatically).
- Take a booking: it collects the guest's details, creates a draft booking, and texts them a payment link. See How AI bookings work for the full flow and safeguards.
Bookings taken this way are tagged with the source AI Chat Bot so you can report on them.
Review what guests asked
Every conversation is saved with an AI summary. See Review AI chatbot conversations to read transcripts and find gaps to fill in your knowledge base.
Examples
-
Set a custom greeting for a specific audience: for a whale-watching tour, replace the default with
"Ahoy! Welcome to Bayview Whale Watch. I can check today's departure times, book your spot, or answer questions about what to bring — what can I get started for you?"so the first message immediately signals what the bot can do. - Run a bilingual pair of chatbots: create one chatbot with Language set to English for your main site, and a second with Language set to Spanish, each with its own greeting and allowed domain, so each visitor gets a native-language conversation instead of one bot switching mid-chat.
- Know when Upgrade Now matters: if you set up your chatbot months ago and TripWorks has since improved how it handles multi-step bookings or edge-case questions, the "A newer version of this chatbot is available" banner appears next time you open it. Select Upgrade Now to pick up the improvement without rebuilding the bot.
- Respond to a Sync failed badge: if a card shows Sync failed, hover it to read the reason (for example, a temporary connection issue), then select Retry sync from the card's action row. If it keeps failing, contact support with the chatbot's Agent ID from its Info tab.
- Notice a partial Knowledge Base attach: if a card shows Active with a small amber warning icon, hover it to see which knowledge base couldn't attach. The bot is still live and taking bookings; go finish syncing that knowledge base so the bot can also answer from it.
The default greeting, if you leave the field blank, reads: "Hi! Welcome to [your business name]. I can help you check availability, book an experience, or answer questions about what we offer — what can I do for you today?" It's a real starting point, not a placeholder. Most accounts can leave it as-is.
FAQ
What languages can the chatbot speak?
English, Spanish, French, German, Italian, Portuguese, Polish, Dutch, Japanese, Korean, Chinese, Russian, Arabic, or Hindi. Pick the chatbot's language on its Settings tab; it applies to both the text and voice sides of the conversation. If you serve guests in more than one language, create a separate chatbot per language and restrict each to the matching site or subdomain with Allowed domains.
Which AI model should I choose?
The default is a strong, current model that works well for almost every account; you don't need to change it. The AI Model field exists for accounts that want to tune the trade-off. A lighter model responds faster and more cheaply on high-traffic sites, while a stronger model handles more complex or ambiguous guest questions better. If you're unsure, leave it on the default.
What's the Info tab for?
It's a read-only reference panel on each chatbot showing its Agent ID, when it was created, when it was last seen, and how many knowledge bases are attached. Nothing there is editable. Copy the Agent ID from this tab whenever you contact TripWorks support about a specific chatbot; it lets support find the exact bot instantly.
What does "Upgrade Now" actually change?
It refreshes the underlying instruction template your chatbot's agent runs on, picking up TripWorks' latest improvements to booking reliability and answer quality. It does not touch your name, greeting, language, model, icon, allowed domains, or Knowledge Base connections, and it won't interrupt a conversation already in progress. The banner only appears when an update is actually available; if you don't see it, you're already current.
What does a "Syncing…" badge mean, and do I need to do anything?
No. It just means the chatbot's agent is being created or updated in the background, which typically happens right after you create the chatbot, change its language or model, or attach a new knowledge base. It normally clears within a minute or two on its own. The chatbot isn't fully ready to chat until the badge changes to Active.
What does "Sync failed" mean, and how do I fix it?
It means the last attempt to create or update the chatbot's underlying agent didn't complete. Hover the badge to see the specific reason, then select Retry sync from the card's action row, which is the same fix for most cases. If it keeps failing after a couple of retries, contact TripWorks support with the chatbot's Agent ID from its Info tab.
Why does my chatbot show a warning icon even though it says Active?
That amber warning icon means the chatbot itself synced successfully and is live, but one or more of the knowledge bases you selected for it couldn't attach. Hover the icon to see which one. The bot keeps answering from whatever did attach — finish syncing the missing knowledge base (see Build your Knowledge Base) so the bot can draw from it too.
What happened to the "Edit" button on the chatbot list?
It was renamed to Configure. It's the exact same action, opening the chatbot's Settings, Knowledge Base, Allowed domains, and Info tabs. Nothing about what it does has changed.
What does the "Not synced" badge on a knowledge base mean?
It means that knowledge base hasn't finished syncing to the chatbot engine yet, so it can't be selected for a chatbot. Each knowledge base row also shows its word count and content type so you can confirm it has the content you expect. Give it a few minutes and refresh; once it's synced, the badge clears and you can check it under Knowledge Base access.
Can I change a chatbot's language or model after it's live?
Yes. Open the chatbot, go to its Settings tab, and change Language or AI Model like any other field, then save. The chatbot briefly shows a Syncing… badge while the change applies to the underlying agent, then returns to Active.
Related
- Build your Knowledge Base
- Review AI chatbot conversations
- How AI bookings work
- Set up your AI Callbot
Built for attractions, tours & activities
A booking agent on every page
See how attractions, tours, and activities add TripWorks' AI chatbot to their website to answer guests and take bookings around the clock. Book a demo and make the switch.