
The Manifest is your command center for the day — every booking and guest for a selected date, organized by timeslot, with everything you need to run operations in one place. Open it from Manifest in the toolbar.
In this article
- What the Manifest is
- Why it matters
- What you do on the Manifest
- Customize what you see
- See and change custom fields
- Seat guests on a seat map
- Filter the Manifest
- Search the Manifest
- Add notes
- Message everyone on a timeslot
- Print the Manifest
- See who checked in
- Manage resources on the timeline
- Frequently asked questions
What the Manifest is
The Manifest is the guest list for one day. It lists the day's timeslots down the left and, for each one, every booking and guest on it, so a glance tells you who's coming and when. It's the day-of companion to the Calendar: the Calendar shows your schedule over days, weeks, and months, and the Manifest zooms into a single day so you can run it.
Why it matters
On the day of a departure, everyone needs the same answer to "who's coming, and are we ready?" Front-desk staff, guides and captains, and the office all work from the Manifest, so nobody is juggling printouts or asking around. Each booking shows its party size, waiver status, any balance due, notes, and the answers guests gave to your custom fields, and a late booking or a cancellation appears here without anyone re-typing it. It's also where you can fix things on the spot: update a guest's answer, move someone to a seat, or swap a guide or vehicle.
The Manifest stays current on its own. When a booking on the day changes, the row updates without a reload, including after you close a booking panel.
What you do on the Manifest
- See and change custom fields in one place. Turn any custom field on as a column and you see every guest's answer, such as weights, meal choices, or shirt sizes, side by side for the whole day. For per-guest fields, select a value to update every guest on that booking without leaving the Manifest. See Viewing and editing custom field responses and What are custom fields.
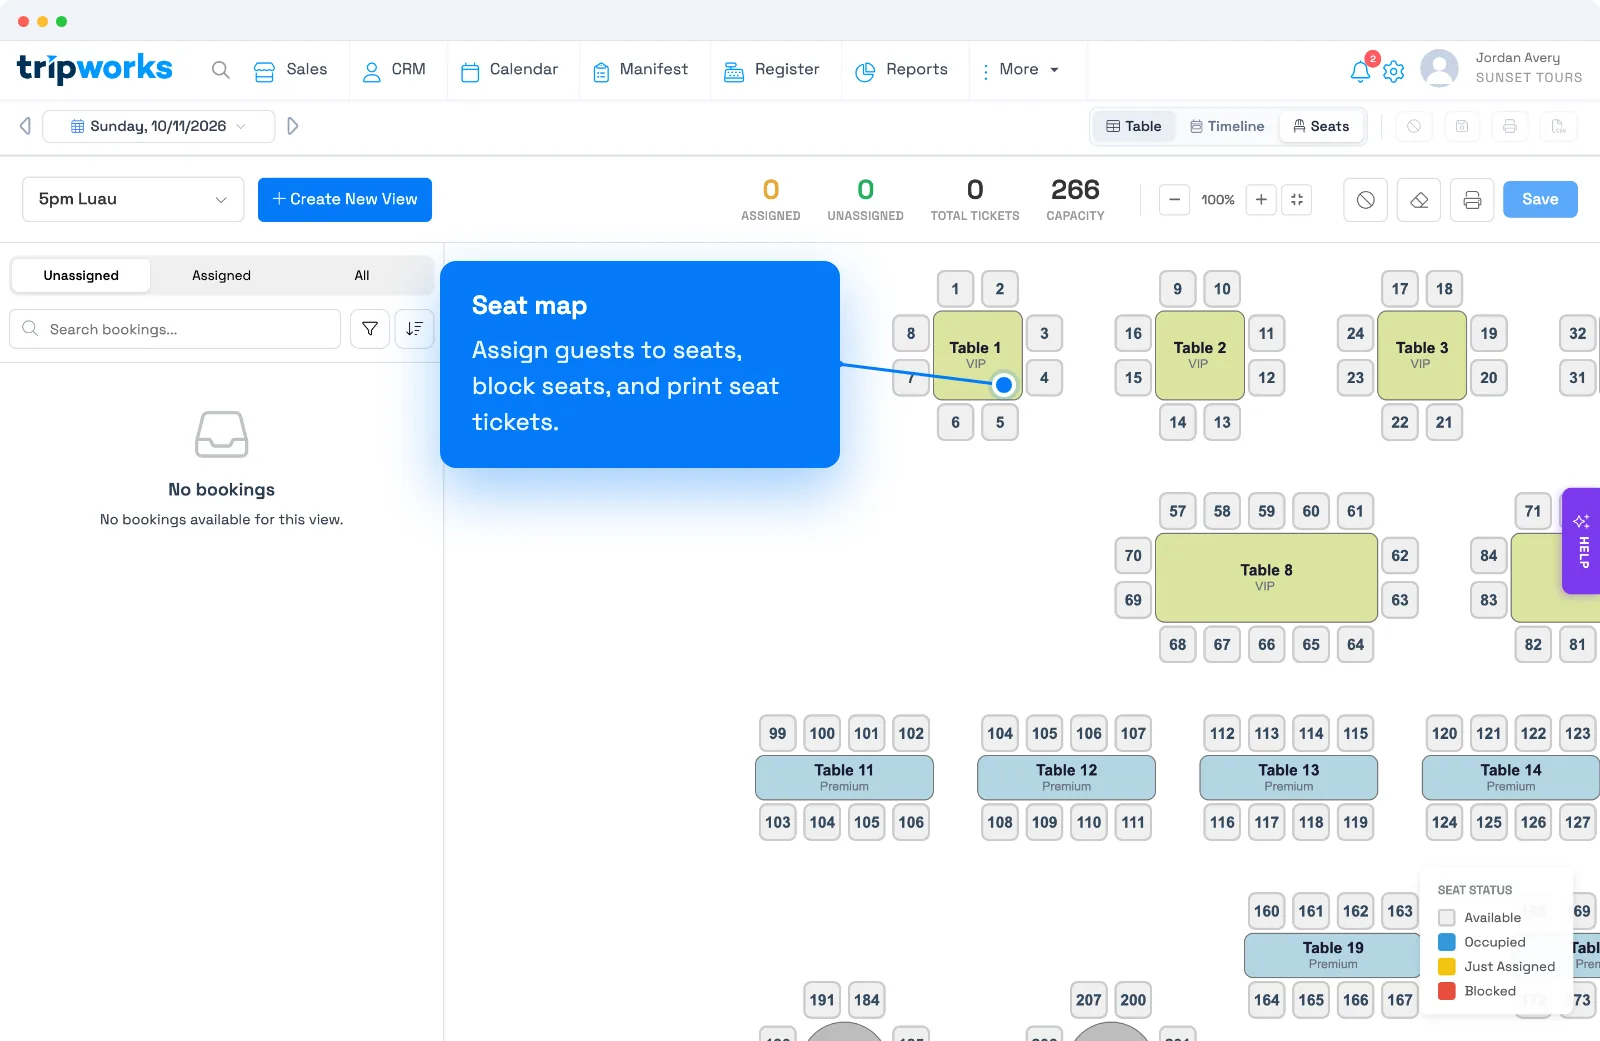
- Seat guests on a seat map. If an activity has a seat map, switch to the Seats view to assign guests to specific seats, block seats, and print seat tickets. See Assigning seats from the Manifest, and Seat maps: overview and setup to build one.
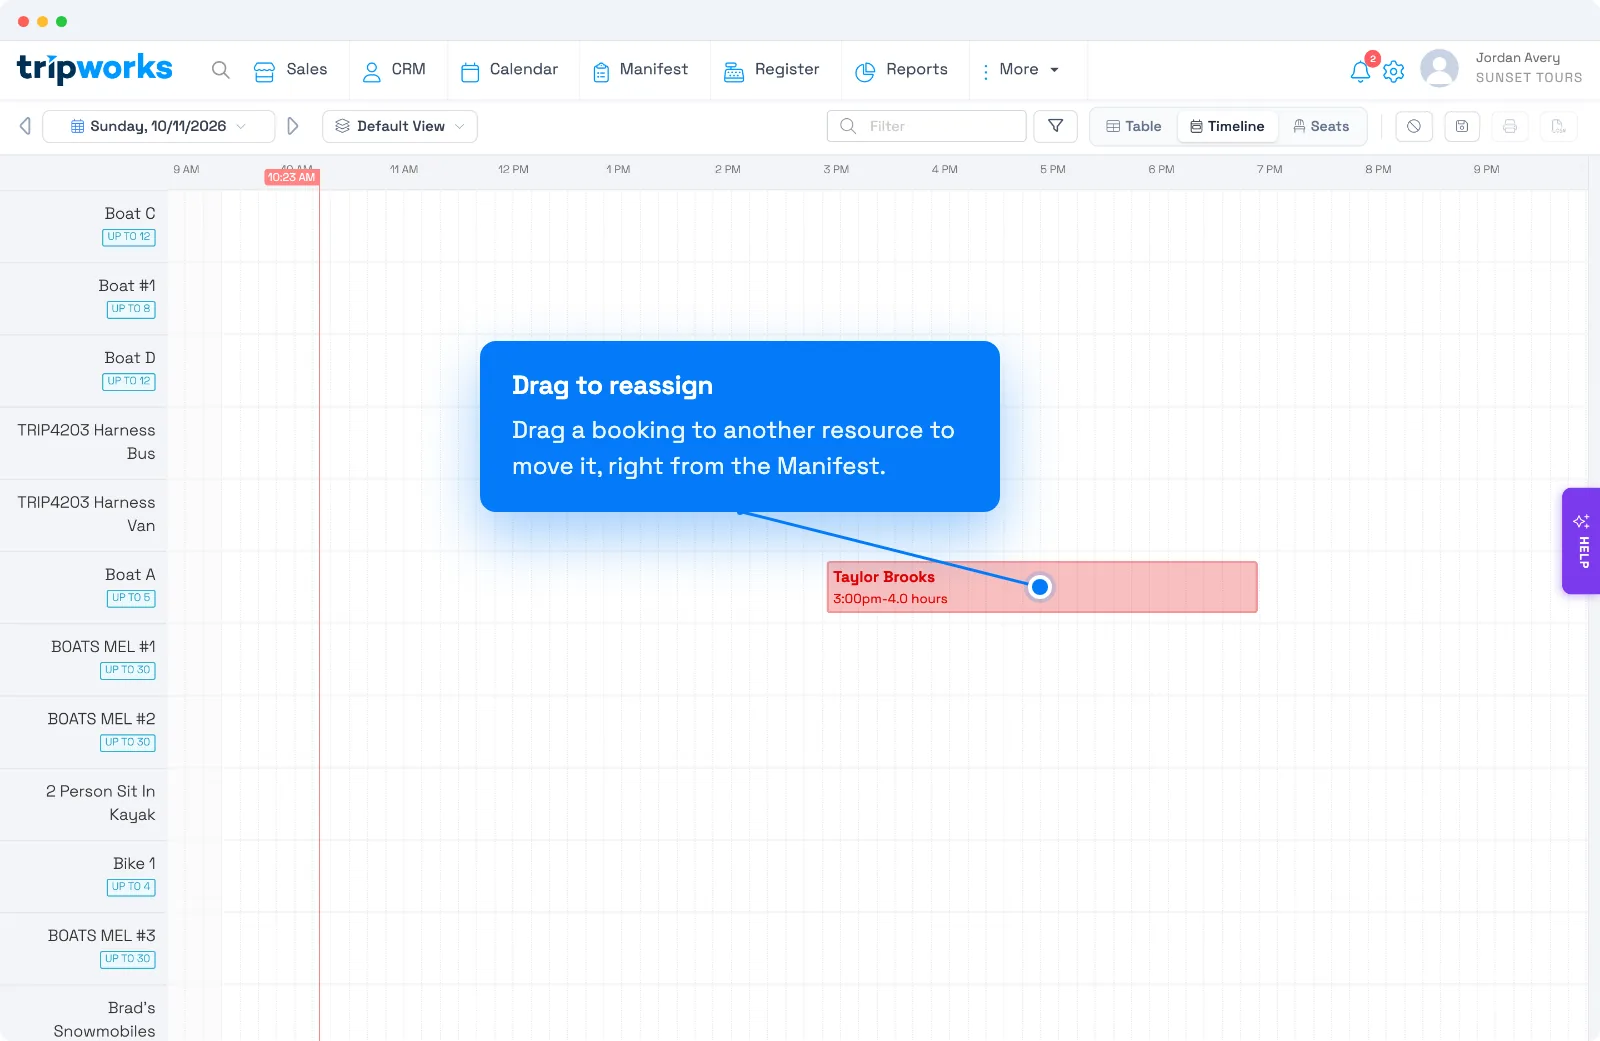
- Manage resources by dragging. The Timeline view shows the day's guides, vehicles, and equipment against the schedule, and you add or reassign them by dragging. See "Manage resources on the timeline" below and Resources and resource groups.
Everyday jobs live here too: check guests in, add notes, message everyone on a timeslot, print a head count, and cancel a departure with guests notified.
The sections below show how to tailor the Manifest to each role and how to do each of these.
Customize what you see
Different roles need different information. A front-desk agent checking guests in wants names and waivers; a guide wants assigned resources; the office wants balances. Tailor the Manifest to each:
- Open Manifest and select the ellipsis icon next to any trip (switch dates if none are listed).
- Choose Customize Columns.
- Toggle columns on or off, and reorder them so the right fields show in the right order.
Save custom layouts as views so your team can switch instantly between, say, a check-in view and a logistics view — the right info, every time, without re-configuring.
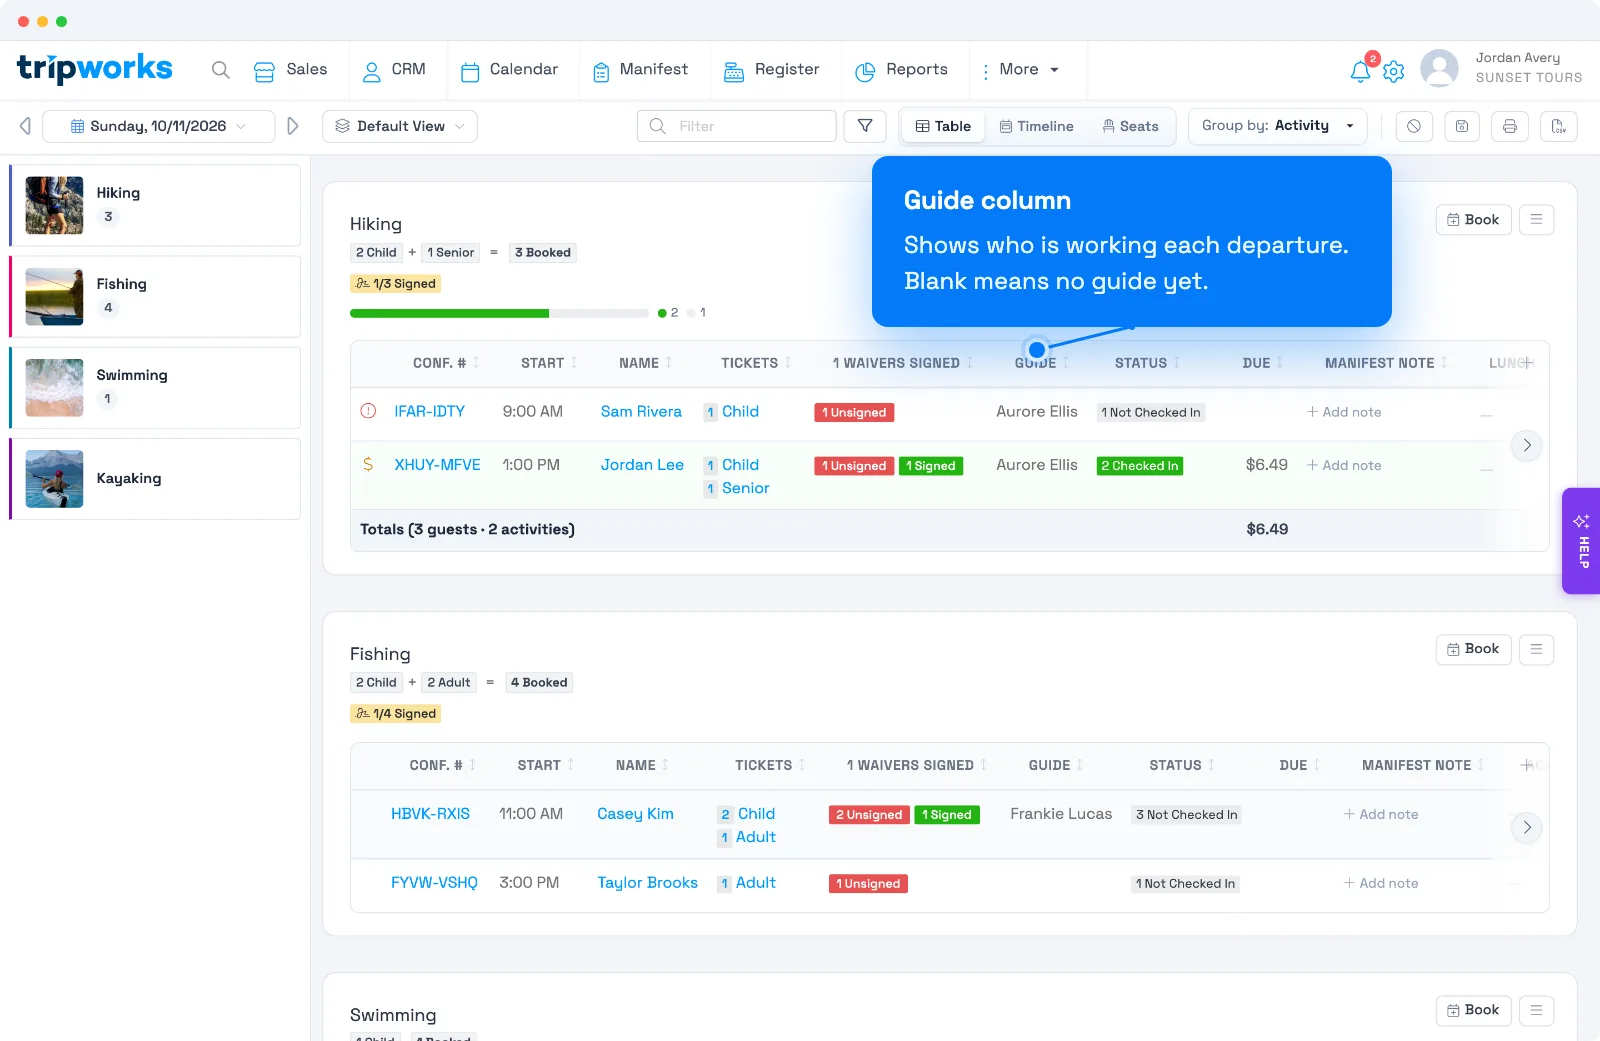
Show who's assigned: the Guide column
Turn on the Guide column to see who is working each departure right on the Manifest. It lists the guide or guides assigned to that timeslot and stays blank when nobody is assigned yet, which makes open departures easy to spot. It's off by default, so add it with Customize Columns. If your account renames guides (for example to Pilot or Captain), the column uses your term. The same names carry through to the printed Manifest and the CSV export.
See and change custom fields
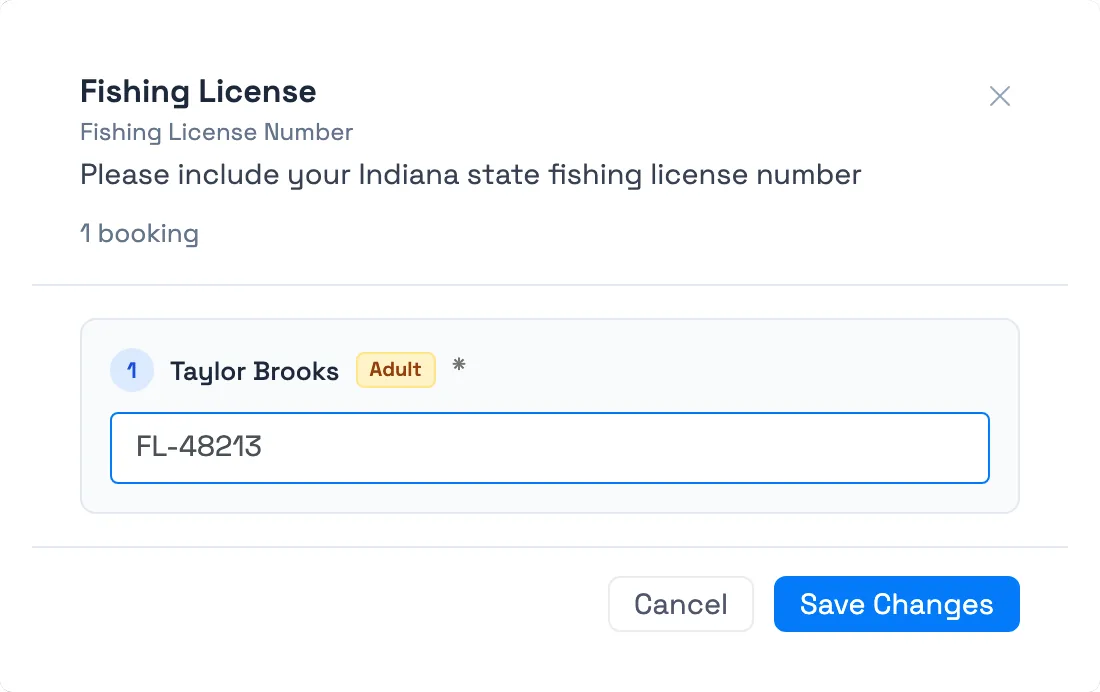
Custom fields, such as weights, meal choices, or shirt sizes, show on the Manifest as columns you can turn on in Customize Columns, so every guest's answer is visible side by side for the whole day. For a field you ask of each guest, select a value (a pencil appears) to open an edit window listing every guest on that booking, then update everyone's answer in one place. A field you ask once per trip is display-only here, so change it from the trip itself. See Viewing and editing custom field responses.
Seat guests on a seat map
If an activity has a seat map, choose Seats in the upper right, next to Table and Timeline, to assign guests to specific seats, block seats, clear assignments, and print seat tickets. See Assigning seats from the Manifest, and Seat maps: overview and setup to build one.
Filter the Manifest
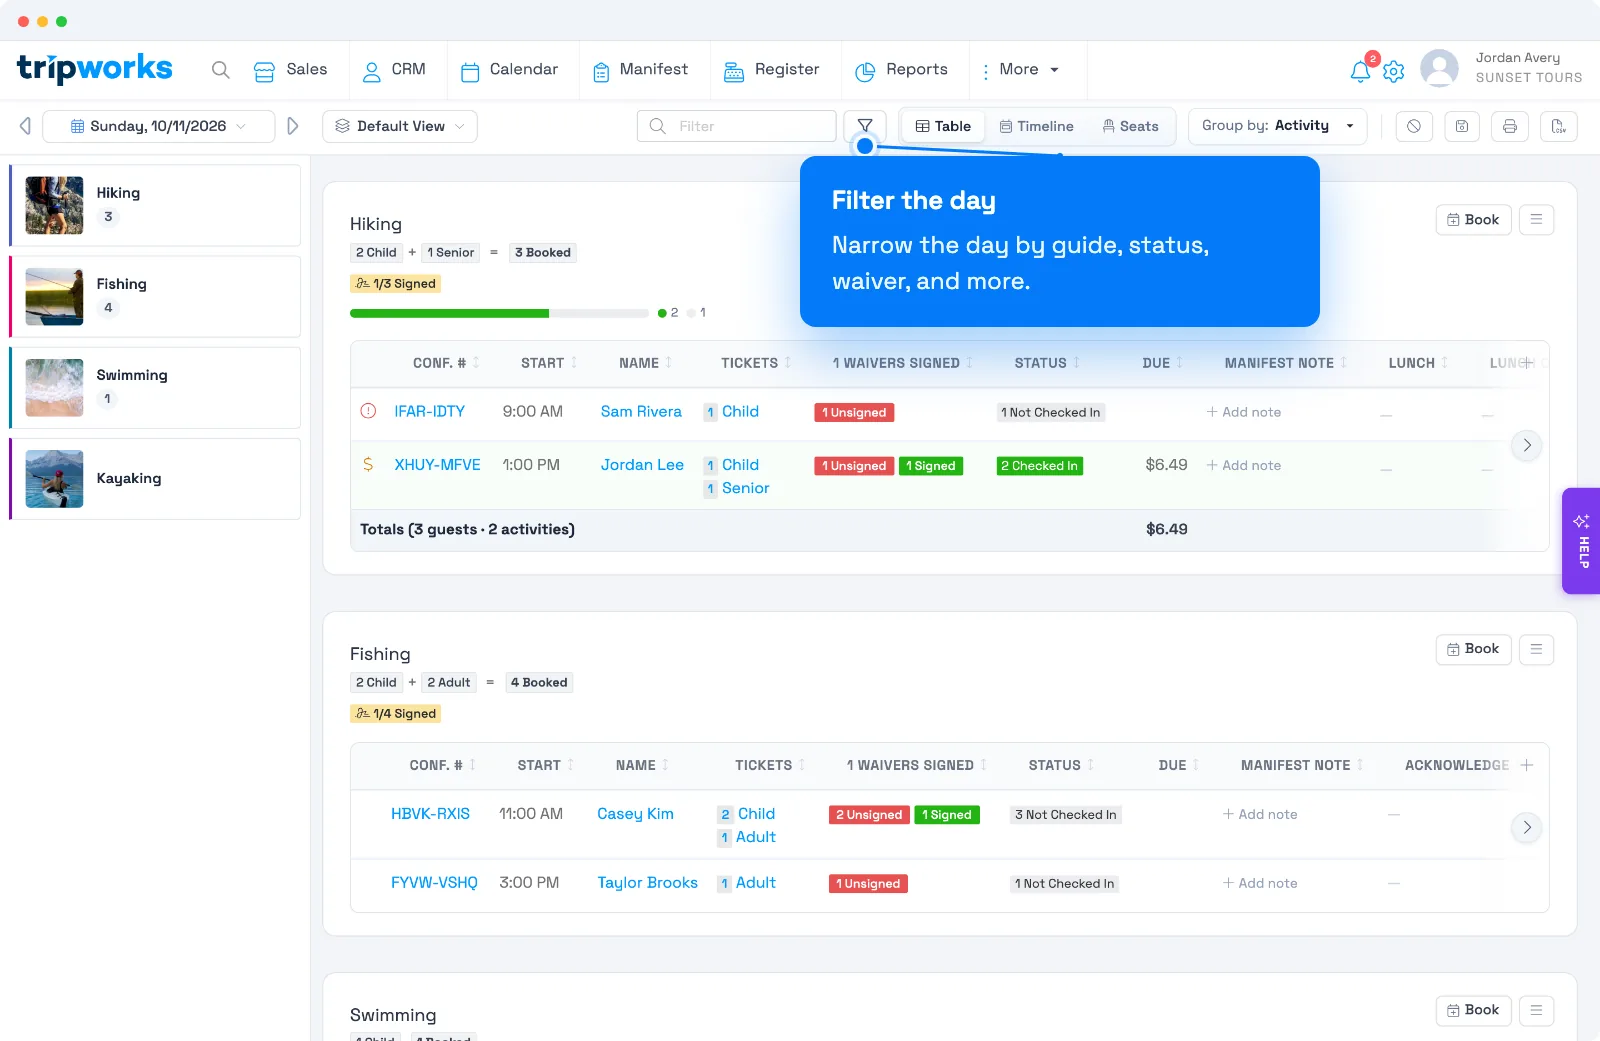
Use the filter icon (the funnel next to the search box) to narrow the Manifest to what you need. Add one or more rules, choose how they combine with AND or OR, and select Apply Filters. A number on the filter icon shows how many rules are active, and rules you save as part of a view come back the next time you open that view.
Show only one guide's departures
To see just the departures a certain guide is working:
- Select the filter icon and choose Add a filter.
- In the first dropdown, choose Guide. If your account renames guides, it appears under your term, such as Pilot.
- Leave the operator on Is One Of and pick one or more guides.
- Select Apply Filters.
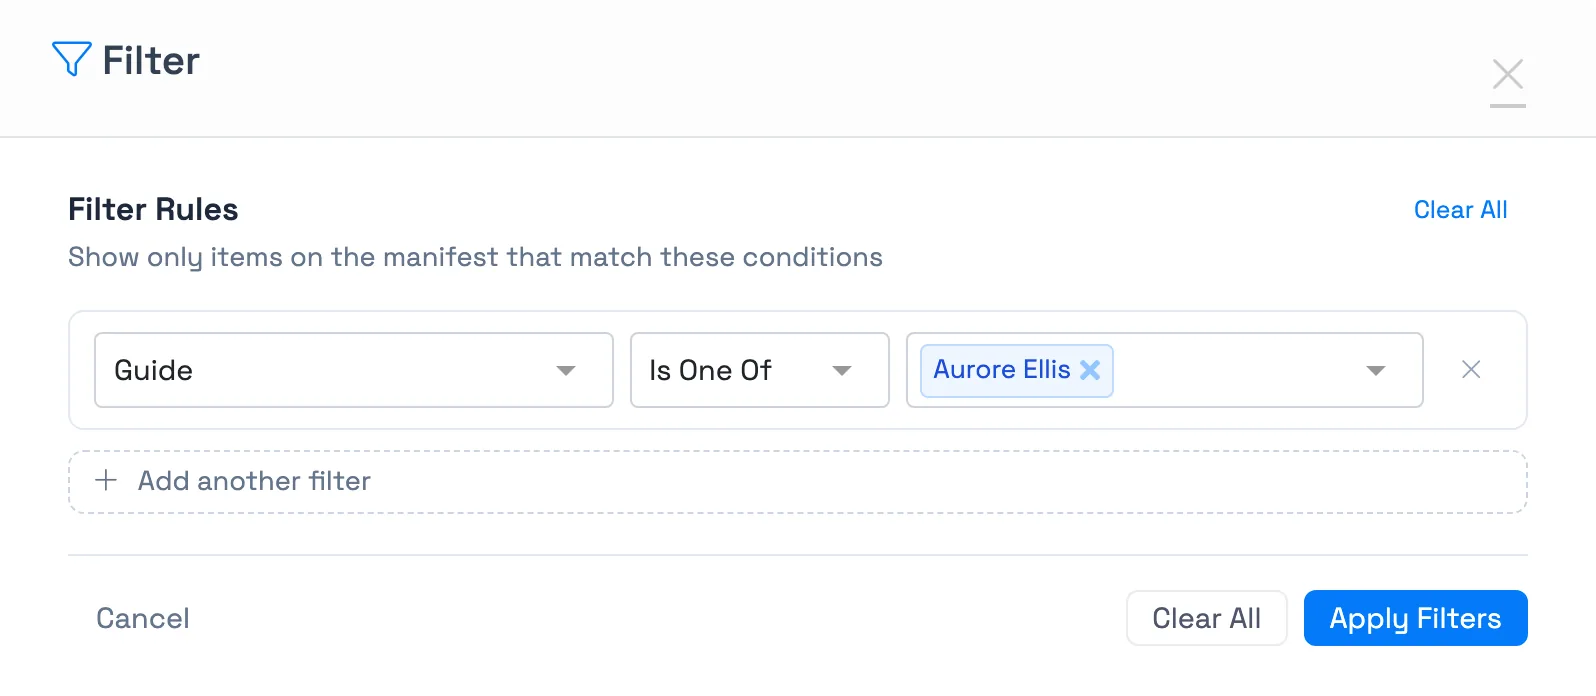
The Manifest now shows only the timeslots those guides are assigned to, along with the guests booked on them. Departures that don't include the guides you picked disappear, and so do departures with nobody assigned yet. The Timeline and the printed Manifest follow the same rule.
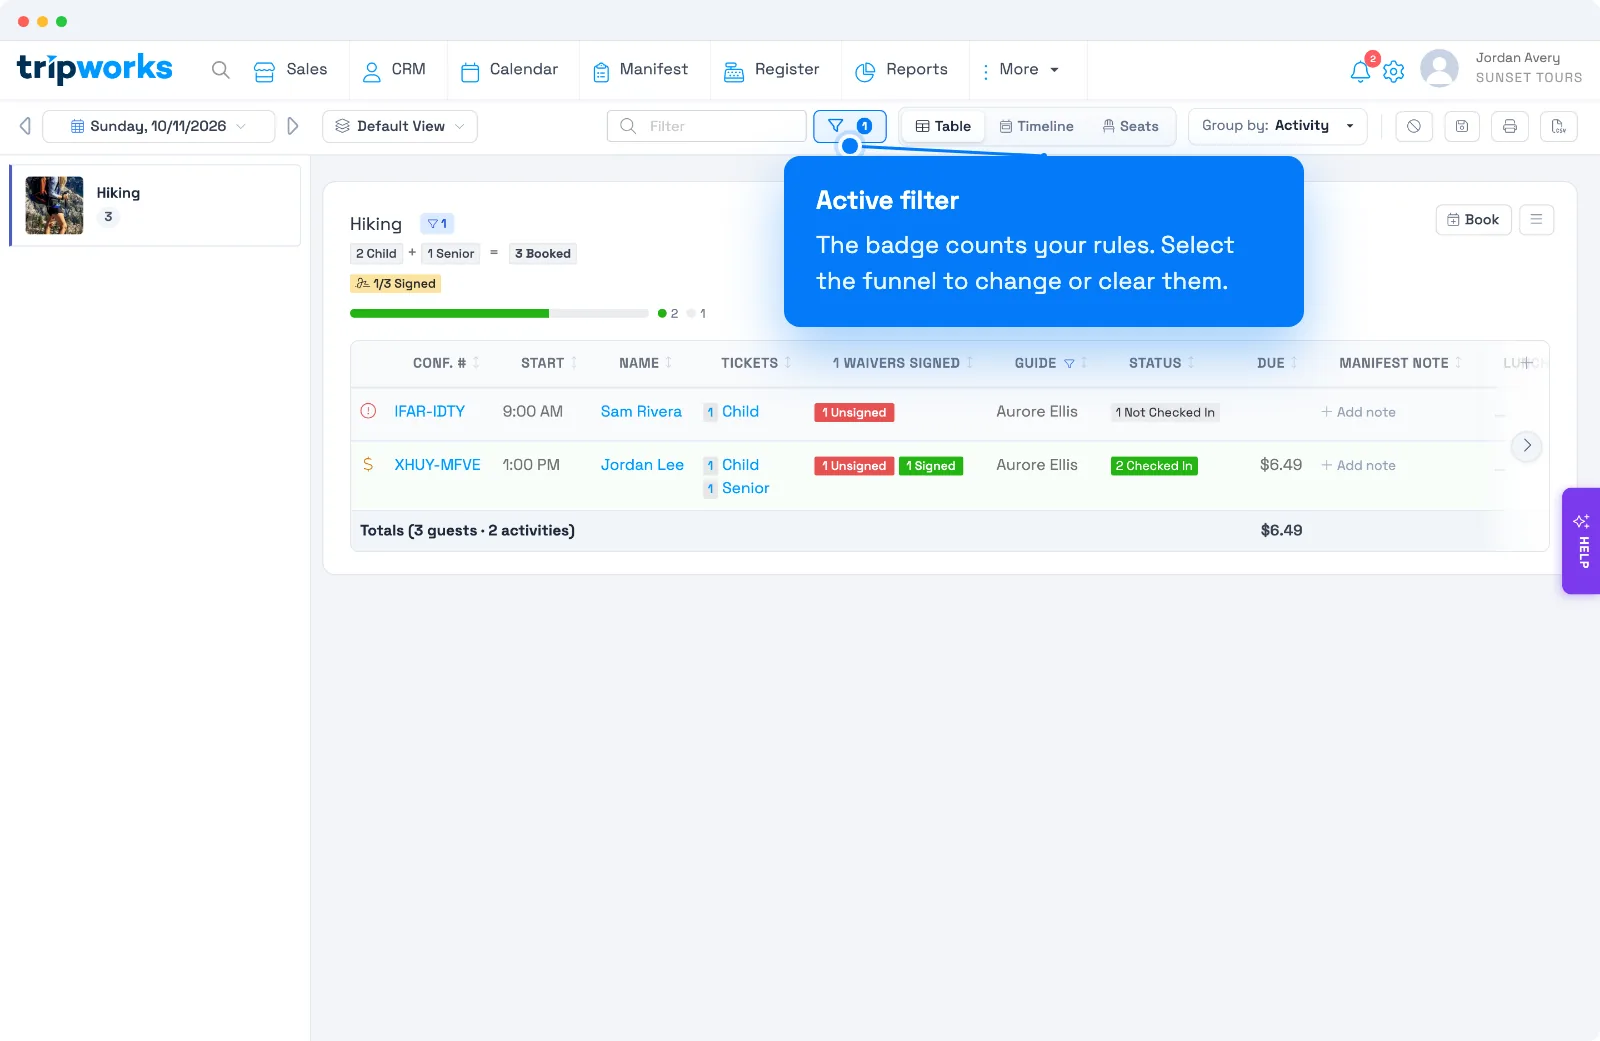
A few variations:
- Find departures with no guide yet. Pick Unassigned in the guide list.
- Hide one guide's departures. Switch the operator to Is Not One Of. Departures with no guide assigned stay visible, so you can see everything else that day.
- Combine with other filters. Add a second rule, such as check-in status, to see only the guests still waiting on a guide's departure.
The Guide filter is for focusing your own view. It doesn't limit what anyone is allowed to see, and anyone using the Manifest can clear it. To control which trips a team member can see, use their permission group.
Search the Manifest
Use the Manifest's Filter box to jump straight to a booking instead of scanning the list. It matches the start of a confirmation code or a guest name, so typing "Mar" finds Maria and Martinez. To search by any guest on a trip (not just the lead guest), make sure the Guest Names column is turned on first (Customize Columns, above); with it hidden, search only matches the lead guest, display name, or confirmation code.
Add notes
Notes are internal (guests never see them) and show right on the Manifest:
- A note on a trip — for example, "guest running late, hold for head count." Select the pencil icon next to the trip, add the note, and save. (If you don't see a Notes column, add it via Customize Columns.)
- A note on the activity/timeslot — for example, "wheelchair guest pre-boards." This shows on the Manifest under the timeslot and on the calendar for that date and time, so the whole team sees it.
Message everyone on a timeslot
When a trip changes, you can notify all its guests at once. Select the ellipsis next to the Book button and choose to message all guests; pick a message template and send. Handy for weather holds, time changes, and reminders. Whether the message goes out by email, SMS, or both depends on how the template itself is set up: there's no separate channel picker in this window.
Message only guests with a specific status
You don't have to message everyone on the timeslot. Select the filter icon (next to the template dropdown) to open Filter recipients who:. This shows checkboxes for the built-in statuses (Not Checked In, Checked In, No Show) plus any custom booking statuses your account has created, like "On the Boat," each shown in the same color as its badge on the Manifest.
Every status starts checked. To message just one group:
- Open Send a Message from the timeslot's ellipsis menu.
- Select the filter icon to expand the status checkboxes.
- Uncheck every status except the one you want. For example, uncheck everything but On the Boat.
- Watch the "N of M guests will receive this message" banner update live as you toggle checkboxes, so you can confirm who's included before sending.
- Pick a template and select Send.
Checking multiple statuses includes anyone matching any of them, not just guests matching all of them at once. If you uncheck every status, the recipient count drops to zero and Send disables: nothing goes out until at least one status is selected.
Print the Manifest
Captains and guides often need a paper head-count. You can print two ways:
- The whole day — select the print icon in the upper right.
- A single activity — open that timeslot in the left pane, then print it.
See who checked in
The Manifest's Status column shows each guest's booking status at a glance. To pull a list across trips — useful for review emails to only those who attended, or re-marketing — run the Activity report and open Detail; the Status column shows applied booking statuses, including any custom statuses you've created. (If your account renames activities, the report may appear under a name like "Tours" or "Flights.")
Manage resources on the timeline
Select Timeline in the upper right to see the day's resource assignments — guides, vehicles, and equipment — with start times and durations (and dates, for multi-day usage). You can add or reassign resources by dragging, right from the Manifest, which makes last-minute staff or equipment changes easy. For how resources are set up, see Resources and resource groups.
When a move would overbook a resource
Moving a guest to a resource checks that resource's capacity first, whether you drag on the Timeline or change the resource on a booking. If the move would put the resource over its capacity, or into a blackout, TripWorks stops and tells you why, for example "Not enough room on Kayak #2", with how many guests it fits and how many it already has for that time.
- Select Cancel to leave the guest where they are. Nothing changes.
- Select Assign anyway to go ahead and overbook it on purpose.
Team members who sell through a reseller channel can't override: for them the move is refused. The check applies to activities that use resource-based capacity.
Frequently asked questions
Can I see only the departures a certain guide is working?
Yes. Select the filter icon, add a Guide rule (it uses your account's own term, such as Pilot), choose Is One Of, and pick the guide. Only the timeslots that guide is assigned to stay on the Manifest, and you can save the filter with a view.
How do I find departures with no guide assigned?
Add a Guide filter and pick Unassigned. You can also turn on the Guide column and look for blank cells.
Does the guide filter stop a team member from seeing other trips?
No. It only changes your own view, and anyone can clear it. What each team member can see is controlled by their permission group, not by this filter.
Can each team member have their own Manifest layout?
Yes. Customize columns and save named views for different roles — check-in, logistics, guides — and switch between them instantly.
Can I search the Manifest for a specific guest's name?
Yes. The Manifest's Filter box matches the start of confirmation codes and guest names. To match any guest on a trip rather than just the lead guest, turn on the Guest Names column first via Customize Columns. With it hidden, search only checks the lead guest, display name, or confirmation code.
Can guests see the notes I add?
No. Manifest notes are internal only, visible to your team on the Manifest (and, for activity notes, on the calendar).
How do I check guests in?
From the Status column, or with one click using the Actions column — see Checking in guests.
Can I message only guests with a certain booking status?
Yes. Open Send a Message from the timeslot's ellipsis menu, select the filter icon, and uncheck every status except the one(s) you want to message. The recipient count updates live so you can confirm who's included before you send.
Related
Built for attractions, tours & activities
Run your day from one screen
See how attractions, tours, and activities run operations on TripWorks. Book a demo and make the switch.