
A kiosk lets walk-up guests pick an activity, book it, and pay by card on an Android tablet, without staff. You design what the kiosk shows in the widget builder, pair each tablet to it, and connect a card reader to the tablet.
In this article
The kiosk is turned on per account. If you don't see Kiosks under Tools & hardware in Setup, contact TripWorks support to have it enabled. Your account may call it by another name, and the screens use that name.
What you need
- An Android tablet running the TripWorks Kiosk app. The kiosk can't take payments in a regular web browser, and there is no iPad version.
- A Stripe card reader that connects to the tablet by USB or Bluetooth (the Stripe Reader M2 or U200).
- A location in your account that is set up for card readers. The kiosk takes card payments through that location.
- Your activities set up and live in TripWorks. The kiosk sells the same activities, prices, and availability as your booking site.
Learn how to manage permission groups
1. Build the kiosk display
The display is what guests see on the tablet. You build it as a widget, and one display can run on as many tablets as you like.
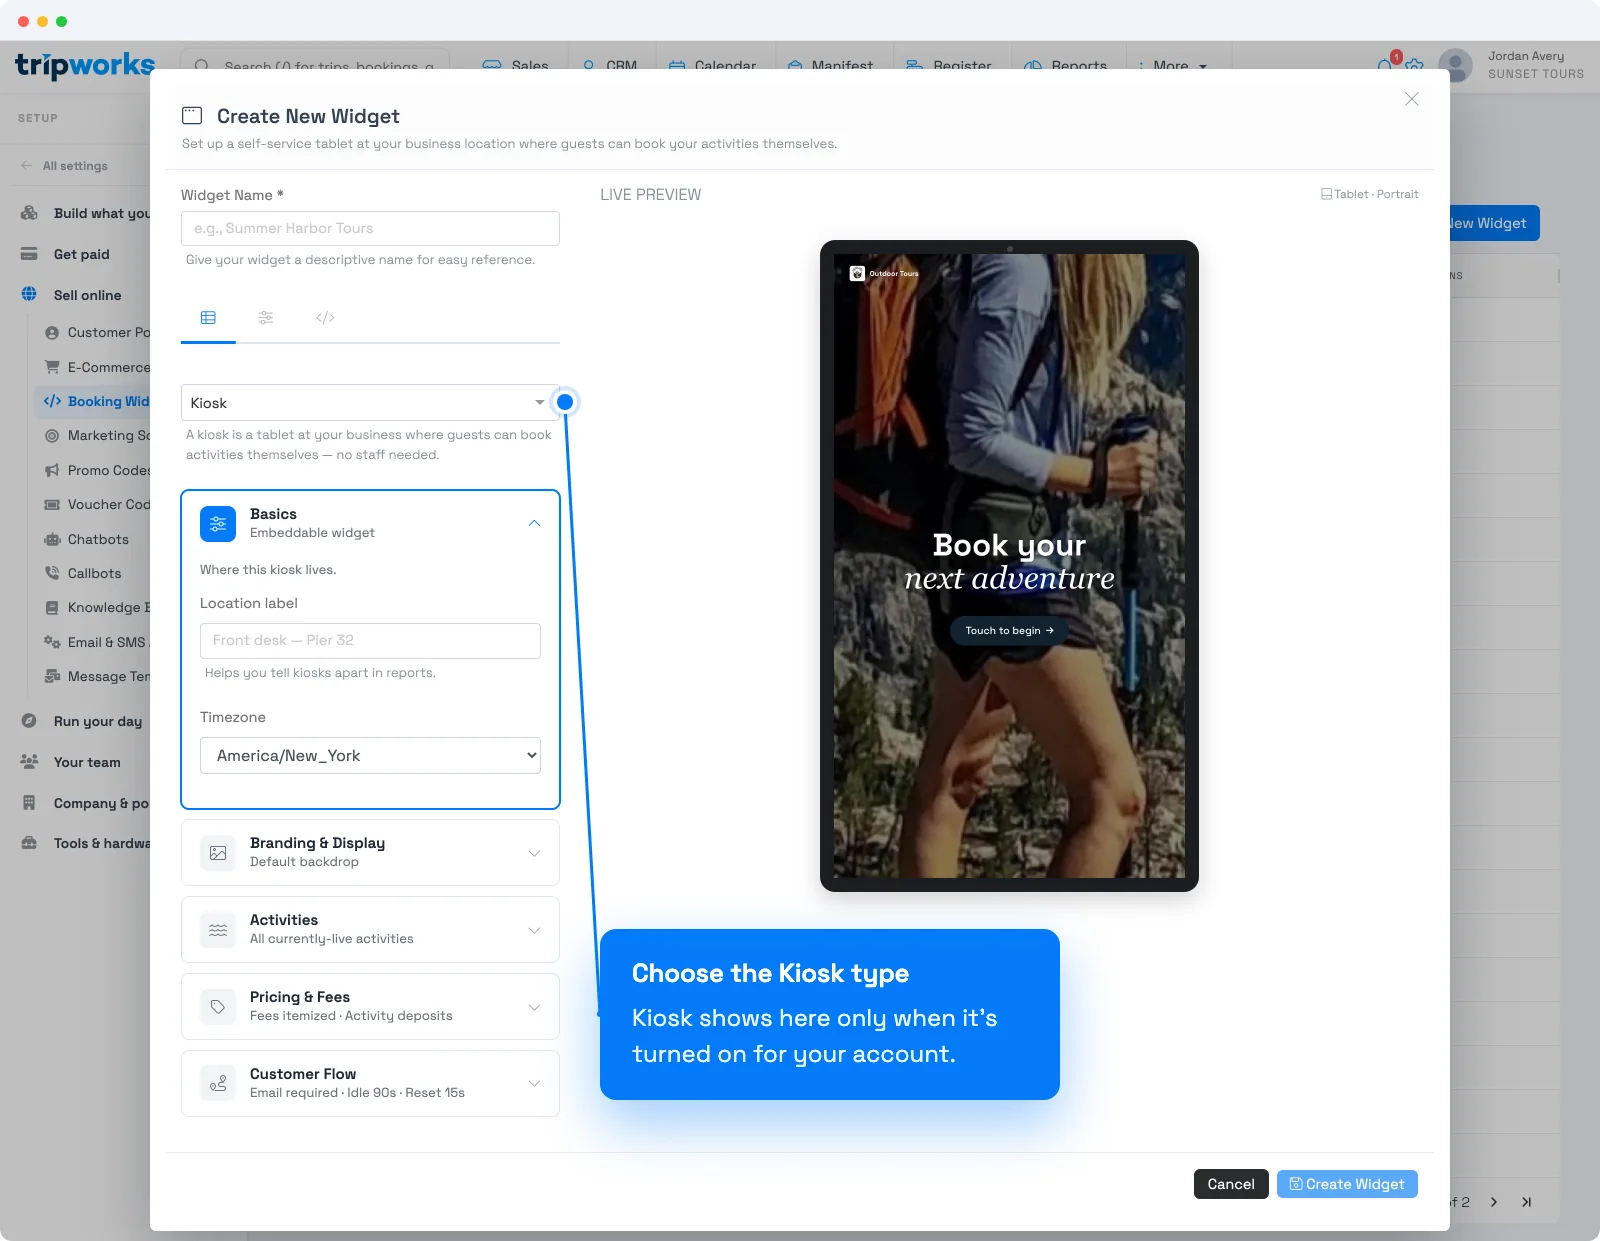
- In the widget builder, create a widget and choose Kiosk as the type.
- Name it, then set up its sections: Basics (a Location label that tells kiosks apart in reports, and a Timezone), Branding & Display, Activities, Pricing & Fees, and Customer Flow. See Create and manage booking widgets.
- In Branding & Display, add a Welcome message (up to 80 characters, the large headline on the start screen) and an Attract-screen photo. The kiosk uses your account logo automatically. Without a photo, it uses one from your activities.
- In Activities, choose which activities the kiosk sells. All live activities are offered by default.
- In Pricing & Fees, choose whether to Show fees as separate line items and whether to Honor activity-level deposit settings. With deposits honored, an activity that takes a 20% deposit online takes the same deposit at the kiosk; otherwise the kiosk charges the full amount. Prices, dynamic pricing, and taxes always come from each activity's own setup.
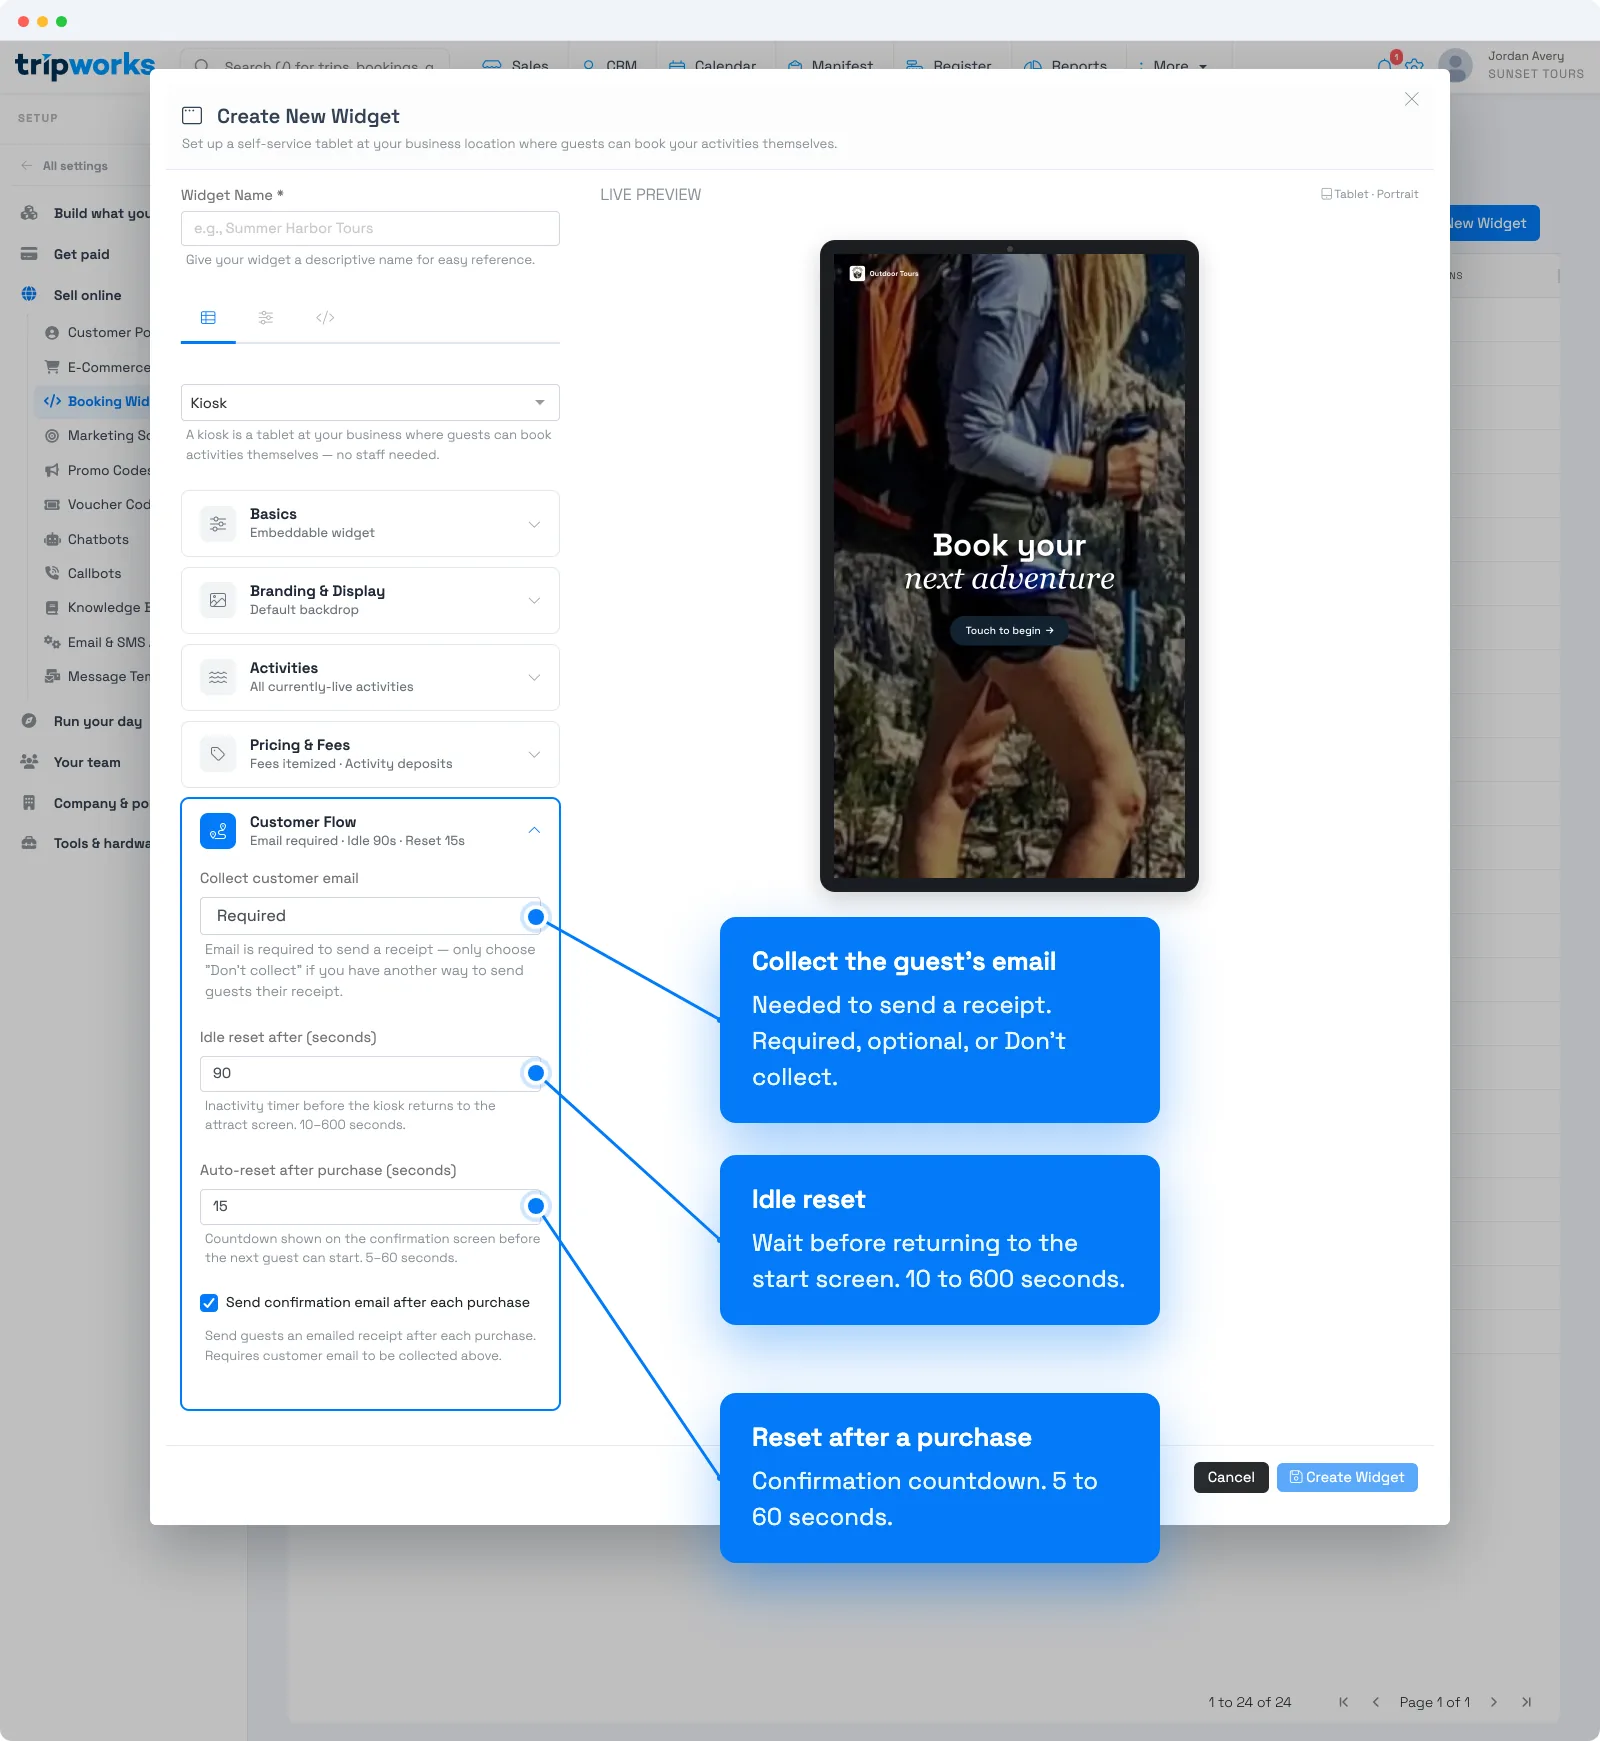
- In Customer Flow, set Collect customer email to Required, Optional, or Don't collect. Email is needed to send a receipt, and Send confirmation email after each purchase is on by default.
- Set Idle reset after (seconds), which is how long the kiosk waits with no touch before it returns to its start screen. The default is 90 seconds, and you can use 10 to 600.
- Set Auto-reset after purchase (seconds), the countdown on the confirmation screen before the next guest can start. The default is 15 seconds, and you can use 5 to 60.
Add a short description for the kiosk
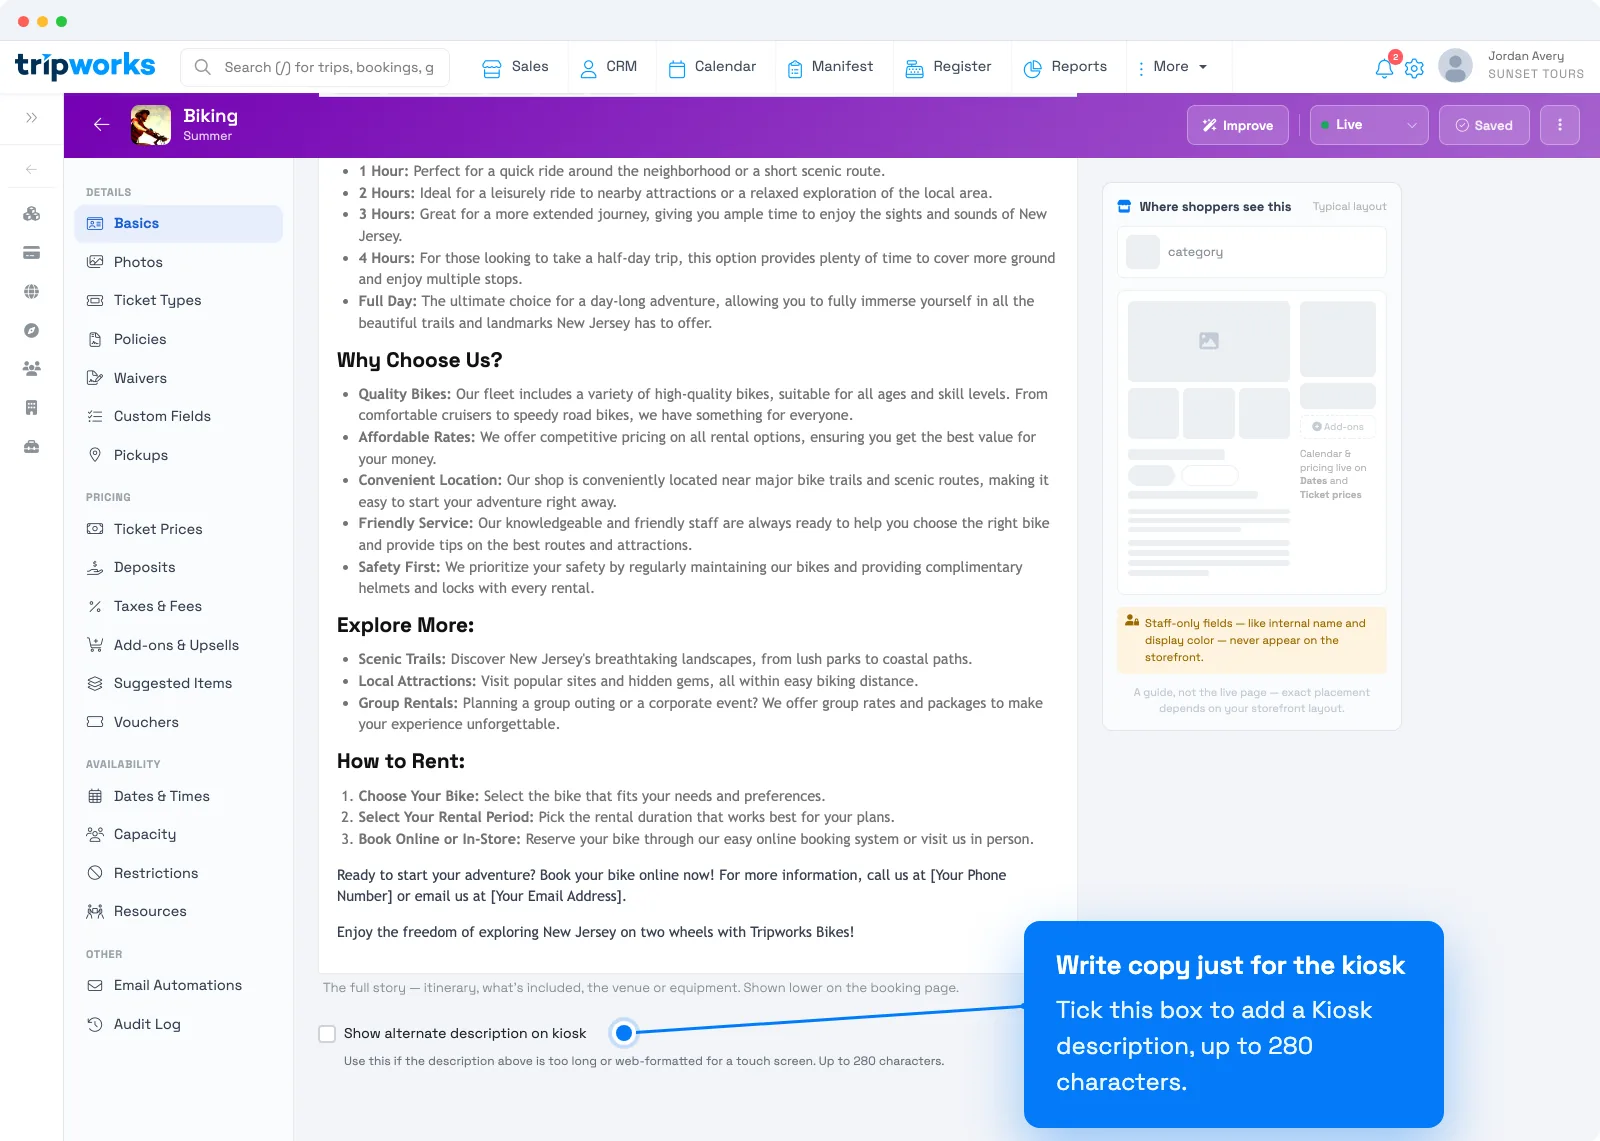
A kiosk can show shorter copy than your website. Open the activity, go to Basics, and choose the Description tab. Scroll to the bottom, tick Show alternate description on kiosk, and write a Kiosk description of up to 280 characters.
2. Pair a tablet
- Go to Setup → Tools & hardware → Kiosks and choose Register a kiosk.
- On the tablet, open the TripWorks Kiosk app. A tablet that isn't paired yet opens on the Pair this kiosk screen.
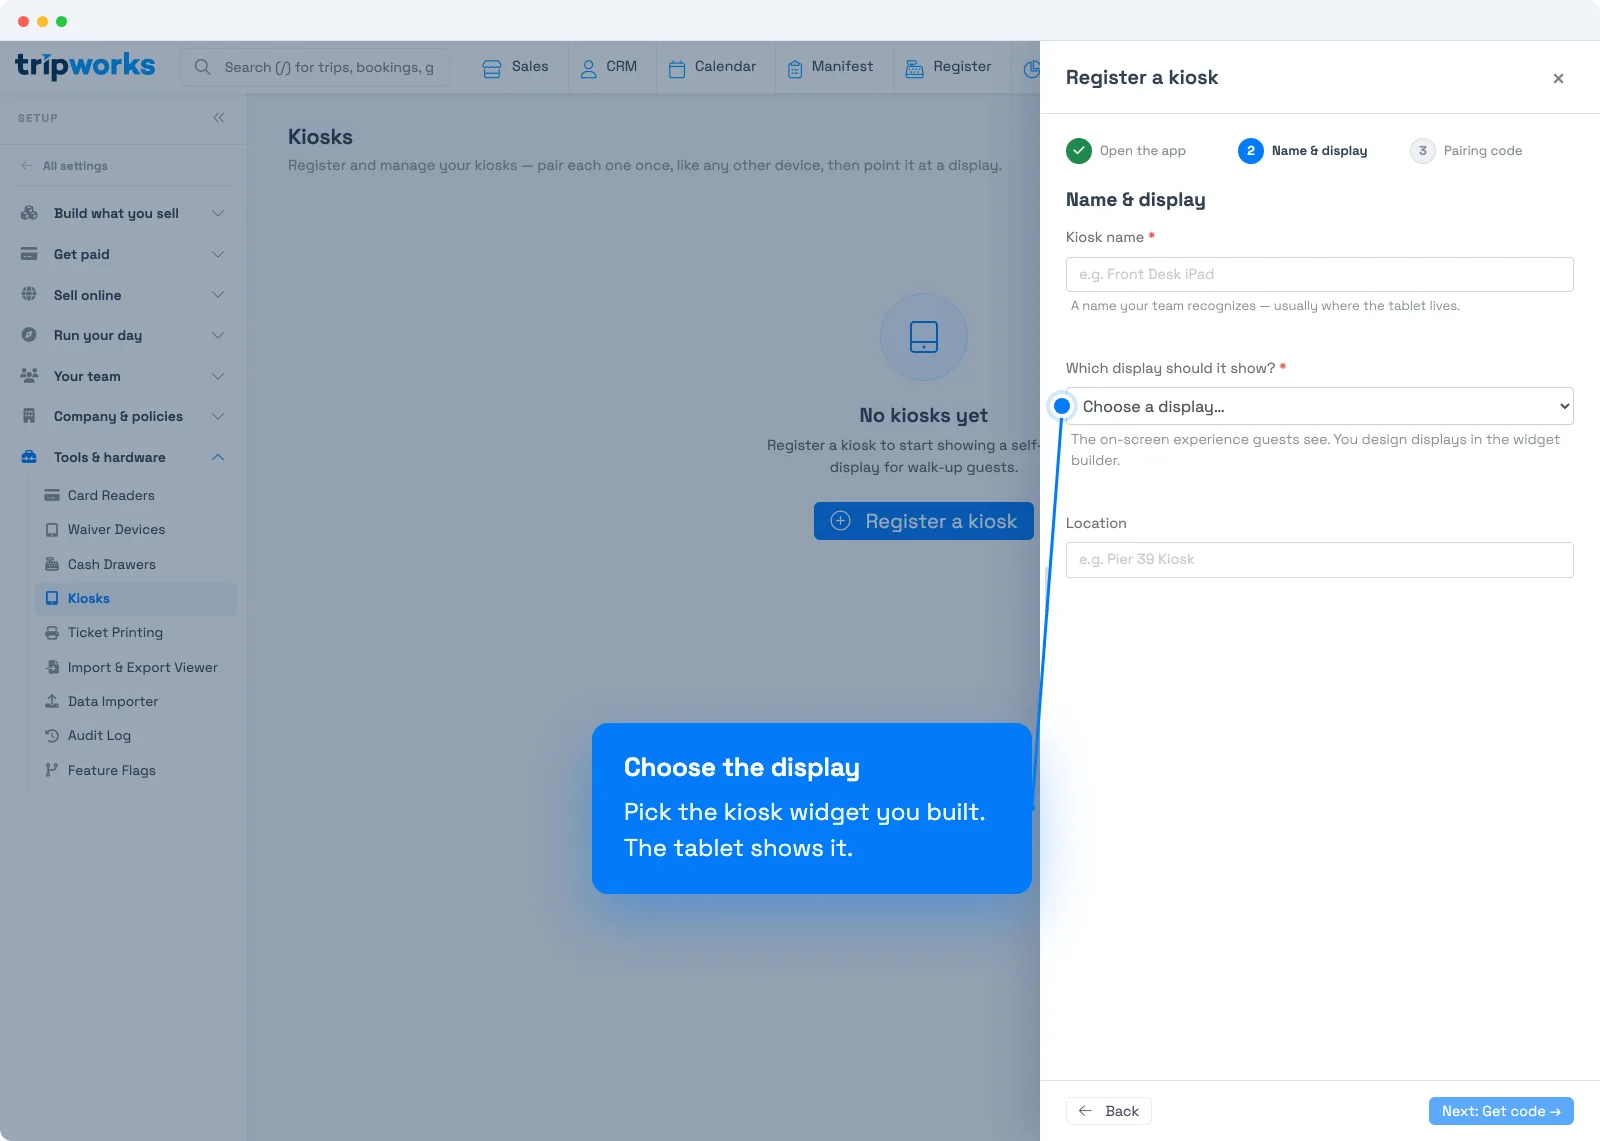
- In TripWorks, choose Next, then enter a Kiosk name, choose the display it should show, and optionally a Location.
- Choose Next: Get code. TripWorks shows a four-character pairing code. Enter it on the tablet within 10 minutes and tap Pair kiosk. If the code expires, choose Generate new code.
The code works once. The tablet then loads your display and is ready for guests. The pairing code connects the tablet to the kiosk, not the card reader; you connect the reader in the next step.
3. Connect the card reader
- USB: plug the reader into the tablet. The kiosk connects to it automatically. The first time, the reader may install a software update before it's ready, so keep it powered on.
- Bluetooth: open the tablet's admin settings (see below), choose Pair Card Reader, and tap your reader when it appears. The tablet's Bluetooth and Location services must both be on. Don't pair the reader in the tablet's own Bluetooth settings first, or the kiosk can't find it.
4. Set an admin PIN
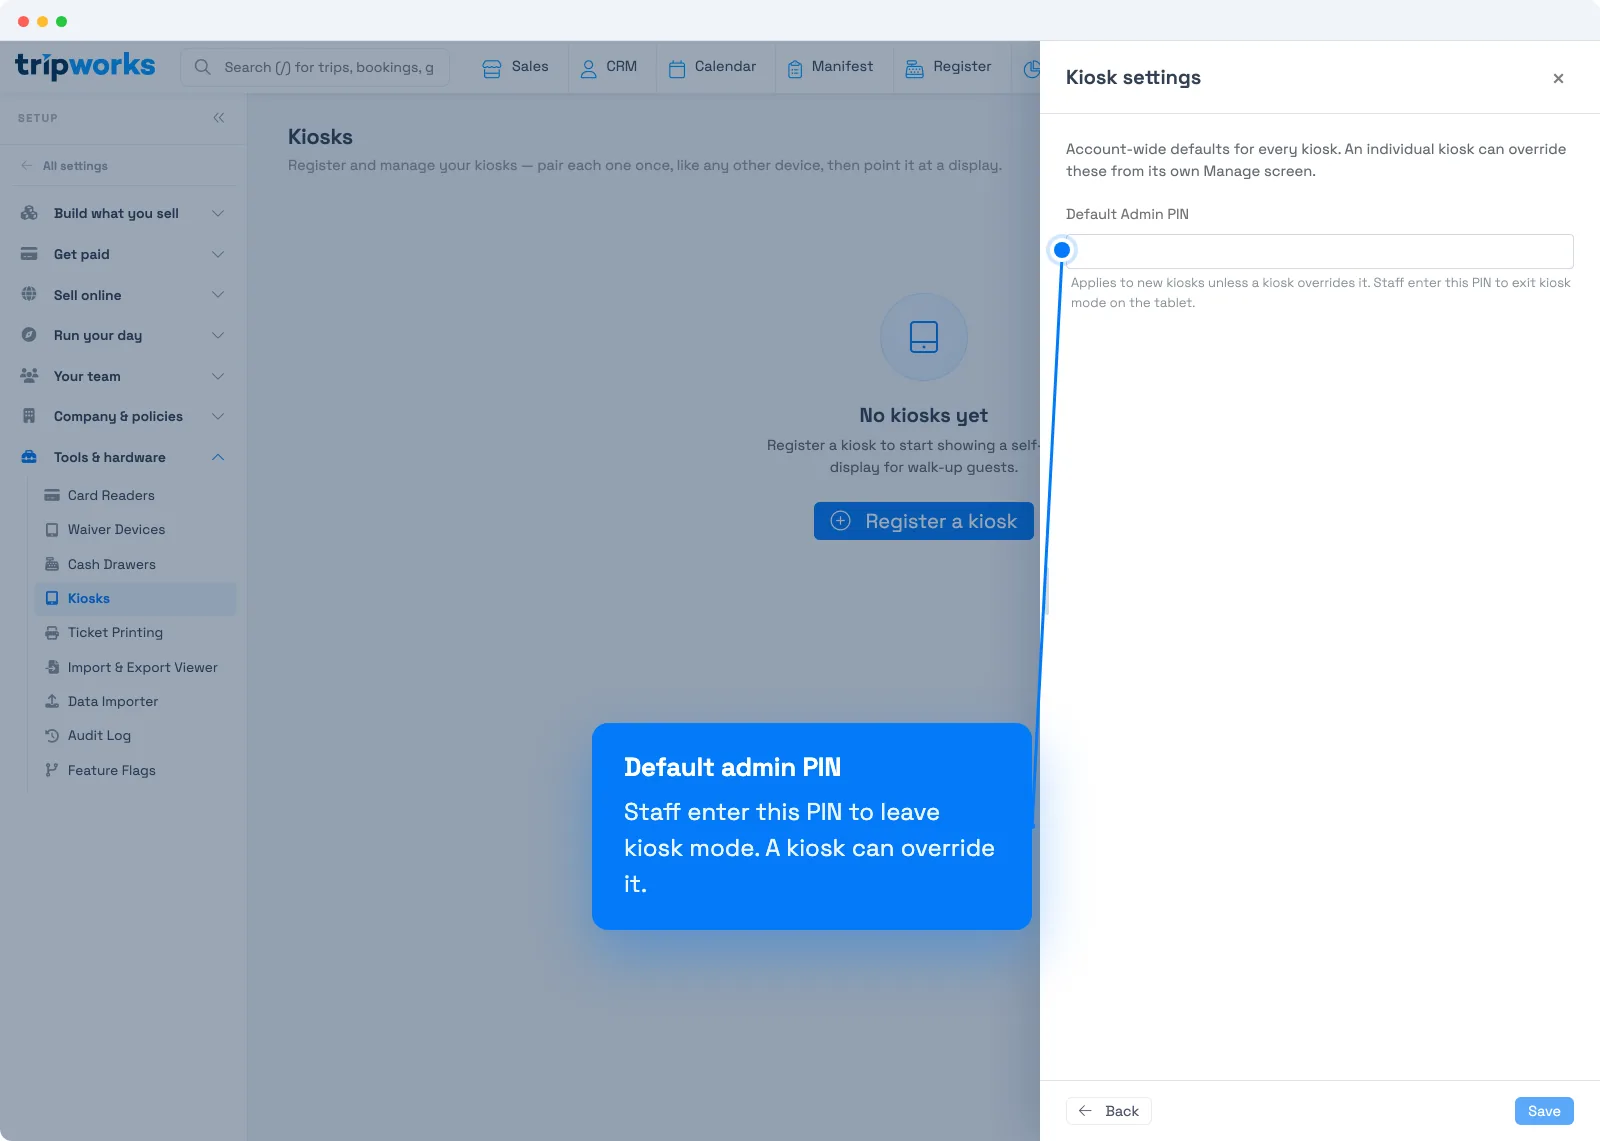
Staff use a four-digit admin PIN to open the tablet's admin settings. Set a Default Admin PIN under Settings on the Kiosks page, or give one kiosk its own with Admin PIN override when you manage it.
Open the admin settings on the tablet
Press and hold the top-right corner of the kiosk screen, then enter the admin PIN. The admin screen shows the account and display the tablet is paired to, and offers:
- Refresh Content reloads the display.
- Pair Card Reader finds and connects a reader.
- Unpair Device disconnects the tablet. You need a new pairing code to use it as a kiosk again.
5. Check it works
Before you leave the kiosk on its own, run one booking end to end. Browse the activities, pick a date and time, pay on the card reader, and confirm the receipt arrives by email. Then wait for the kiosk to return to its start screen.
How the kiosk resets between guests
- A Start over button is always on screen. It asks the guest to confirm, then clears the current booking and returns to the beginning.
- After the Idle reset time with no touch, the kiosk resets itself, which clears an abandoned cart.
- After a purchase, the confirmation screen counts down the Auto-reset after purchase time and then resets. Touching the screen doesn't extend this countdown, so the next guest never sees the previous guest's order.
Manage a kiosk
On the Kiosks page, each kiosk shows whether it's Online or Offline and when it was last online. Open a kiosk to:
- Turn it off with Enabled. A disabled kiosk shows Kiosk unavailable and asks guests to see a staff member. Staff can still open the admin settings.
- Change its name, display, location, or admin PIN.
- Choose Pair a kiosk to pair another tablet to the same kiosk, or Unpair a tablet.
Changes you save to the display reach paired tablets without pairing them again. To load a change right away, use Refresh Content in the tablet's admin settings.
Examples
- Run one display at two entrances: register two kiosks that show the same display, so each entrance appears separately in your kiosk list.
- Sell only same-day activities at the front desk: build a display whose Activities list includes only those activities.
- Keep guest receipts flowing: leave Collect customer email set to Required so every kiosk purchase gets an emailed receipt.
- Close the kiosk for a private event: turn off Enabled for that kiosk, and the tablet shows Kiosk unavailable until you turn it back on.
Frequently asked questions
Can I run the kiosk on an iPad?
No. The TripWorks Kiosk app runs on Android tablets only, and the kiosk can't take payments in a regular web browser.
Is the pairing code for the card reader?
No. The pairing code connects the tablet to the kiosk. Connect the reader to the tablet itself: plug it in over USB, or use Pair Card Reader in the tablet's admin settings for Bluetooth.
My pairing code stopped working. What now?
A pairing code expires 10 minutes after it's created and works only once. If the tablet says the code has expired or wasn't found, choose Generate new code in TripWorks and enter the new one.
The tablet says "Couldn't reach TripWorks." What does that mean?
The tablet couldn't connect to TripWorks at all, so the code was never checked. Make sure the tablet is on Wi-Fi with a working internet connection, then try the code again.
The kiosk says no reader location is configured. How do I fix it?
The kiosk takes card payments through a location in your account that is set up for card readers. Check that you have one under Setup, then choose Refresh Content in the tablet's admin settings. See Set up card readers.
The kiosk can't find my Bluetooth reader. What should I check?
Make sure the reader is charged, powered on, and nearby, and that the tablet's Bluetooth and Location services are both on. The reader must not be paired in the tablet's own Bluetooth settings or connected to another device. Then search again from Pair Card Reader.
How do staff get out of kiosk mode?
Press and hold the top-right corner of the kiosk screen and enter the four-digit admin PIN. You set the PIN for all kiosks under Settings on the Kiosks page, or per kiosk with Admin PIN override.
Why don't I see Kiosks in Setup?
The kiosk is turned on per account, and you also need the Manage iPad & Tablet Devices permission. Contact TripWorks support to have it enabled.
Related
- Set up card readers
- Create and manage booking widgets
- Recommended devices and browsers
- Find your way around Setup
Built for attractions, tours & activities
Let walk-ups book themselves
See how attractions, tours, and activities take walk-up bookings and card payments on a self-service kiosk with TripWorks. Book a demo and make the switch.